Showing posts with label Gaming Table. Show all posts

Incursion 3D Playset - Progress at last!

It has been ages since I've last posted anything. I know, I suck!! It is partly because I've been so busy with other things in my life, and when I say partly, I really mean that's the only reason. Quite simply, I've not made the time for any tabletop gaming or related hobby.

Work, kids, looking after a big old house, working out, running a couple of businesses and other hobbies (LARP for the most part) have simply got in the way.

I've missed the man-cave.

Having spend most of my creative juices building armour and costumes lately. I miss the smell of acrylic paint!

Last weekend I finally spent a few hours clearing out the man-cave. I was pretty ruthless and chucked out a load of old rubbish that was getting in the way and I was 'Saving, just in case I needed it!'

A few hours of cathartic bliss and a few film scores later, I finally made room to work on an old project once again.

I started an Incursion 3D playset back in November 2013 after being inspired by Herrodadog's 3D Board.

So at last, I got the first paint of coat on the base of the gaming board.

Incursion 3D Playset: Dust Tactics miniature for scale
Damn it felt good!

Baby steps!

Dust Tactics: How to Make a Custom 3D Gaming Board

Following on from the teaser reveal last week of my custom 3D Gaming Board I made for Dust Tactics. Here's a step-by-step to guide on how to build your own. This technique is relatively simple and could be used to make a variety of urban, sci-fi, or post-apocalyptic gaming boards (I would like to use this technique for my Judge Dredd Miniatures board). It was pretty quick, easy and relatively cheap.

Dust Tactics Custom Gaming Board, Finished and In Action
Whilst the whole project was undertaken over a series of months, in terms of actual time spent it could really be done in just a few weekends.

Dust Tactics is a board game and. in the Dust Tactics: Core Revised Set, you get a poster sized play-map. The artwork is what you'd expect from a modern 2D gaming map, high quality, thematic and quite generic. Great to get you started but after a while it seems a little bland.

To variety to the gaming surface, the Dust Tactics: Terrain Tile Map Pack adds 12 double sided terrain boards. The terrain board set essentially adds a different theme to the gaming map, the tiles themselves do not change the basic game mechanic, i.e. they don't for the most part (with the exclusion of water) add significantly different terrain effects. It is however, very shiny. Industrial themed, layered colour variations, worn, stained concrete, direction markers and rusty panels.

Dust Tactics Terrain Tile Set

The Dust Tactics maps and terrain boards feature squares that measure around 93mm. I increased this very slightly to 95mm for ease of measurement. Each tile is 3 squares by 3, but for ease of setting up a table I made sections of 9 by 3 squares. I also made just one section of 3 by 3, to help with certain scenario layout configurations. I didn't change the size too much, so that the Dust Tactics: Warzone Tenements (designed to fit the standard map) would still fit pretty well and not look out of place.

The base of the board is 6mm MDF, batten on the outside only. I use the three drill method, Highly recommended. What's the three drill method? One drill for drilling holes, one drill for counter-sinking and one drill for putting the screw in. I made my first terrain board in this method with a single drill and it took about six hours. I made all these boards with three drills in just over two hours. The Drills I picked up were part of a Ryobi Cordless Rechargeable Drill Twin Pack.

The only picture I could find was the one I took when I made my first terrain board, slowly... with a screwdriver.
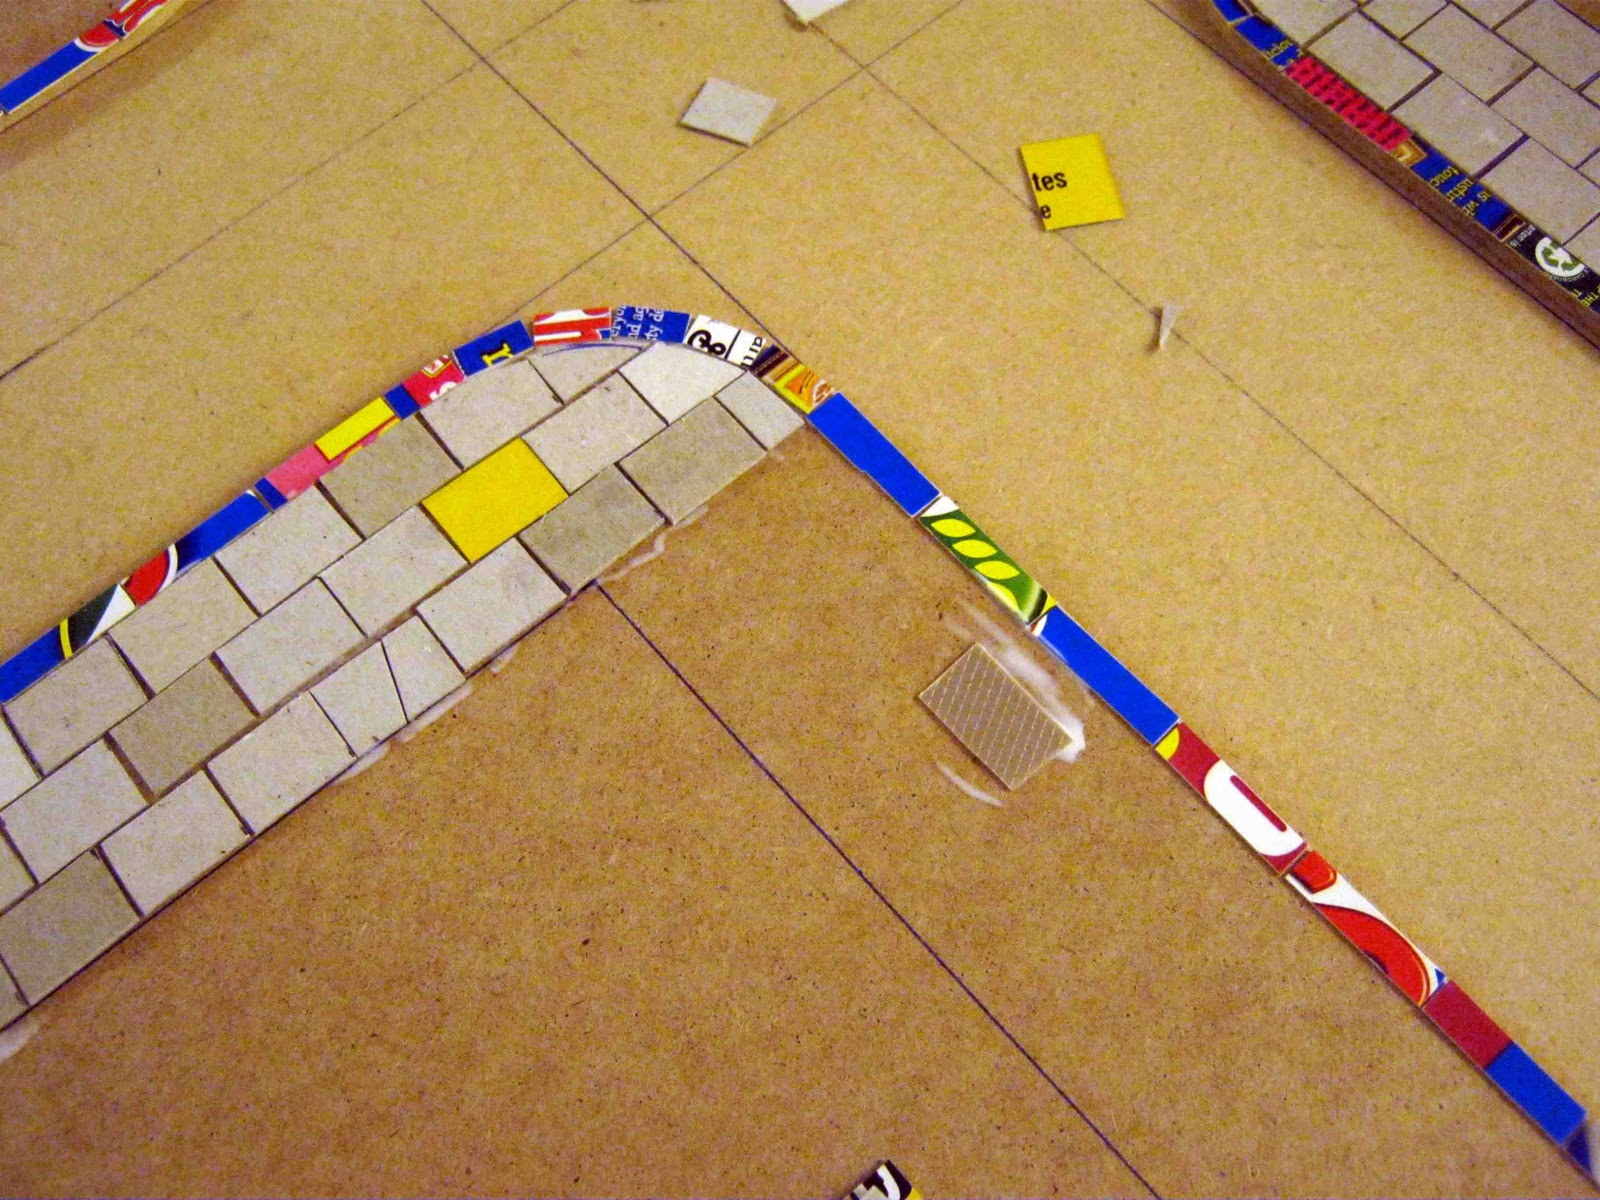
The whole board was then covered in cork tiles, cut down to 95mm squares. Every tile had a bevelled edge created with a quick sanding.

Keeping the tiles even was actually trickier than I anticipated.
Gluing the tiles onto the boards (wood glue) and retaining a good fit all the way along was a little difficult (expansion in contact with wood glue perhaps?) and a few had to be cut down (just a mm or two here and there).Since finishing this project I have found a much quicker way of doing this (on some dungeon terrain tests), which I wish I had known about. Cover the whole board in cork, mark the squares and then cut with a sharp knife at a 45 degree angle along both sides of the line, the bevel pops out easily, much quicker and far less effort. Every day is a schoolday!

First three boards, a standard 9 by 9 game size, unpainted, with rubble terrain WIPs.
Once I had a few under my belt is was simply a case of knuckling down and getting it done.

I base coated the top edge of the boards with a dark grey primer and then primed the whole board with a medium grey house paint emulsion. Rather than trying to dry-brush (which as anyone who has tried it, can be challenging on a large flat surface, I kept the base-coat relatively light.

Undercoat with grey house paint emulsion.
Following the first coat I ran a quick diluted coat over the top in the same grey, this filled in the few spots that got missed on the first pass and also gave some areas a patchy, stained effect.

Panted board, with patchy effect, before colour was added.
To ensure there was more colour variation across the board, I split the board into 3 by 3 sections, using a straight edged mask and here and there, began sponging on colour variations. This was simply a case of choosing a variety of greys, browns, ochres and even some blue and green (more subtle) and after a few tests I stipple sponged on the colour. I added a few smaller squares (hatches or patches on concrete) for more variation.

To add to the industrial feel a drew up some stencils of directions and hazard markings on plain white paper and once again (this time using white, black, red and yellow) sponged on the markings.

Sponging on the markings
Once all of the main colouring was complete a ran over the whole board with a VERY light dry-brushing in a much lighter grey, literary just enough to catch the corners of the squares.

Dust Tactics Custom Gaming Board: Finished, without terrain.
All in all I was very pleased with the result. I have a few more specific pieces to make, two open water boards, one submarine and some customer 'blocking' terrain pieces. The table is likely to get a public outing  as a friend of mine and I are putting on a Dust Tactics display game at the Eastern Front Wargames Show on Sunday 27th July 2014 in Norwich.

Dust Tactics Custom Gaming Board: In Action

Outbreak City: How to Build a 28mm Zombie Gaming Table - Part 4

With the show looming and with TONS of work still to do I kinda knew I had to knuckle down and get the 'texturing' stage finished. You can play All Things Zombie on any surface really, but once I had the vision in my head, I just had to make it a reality.

I was working away from home during the week whilst this project progressed, and I wanted to get this to a 'ready-to-paint' stage before going  away again on the Sunday night.

Rather than lock myself away in the man-cave, and miss out on my family, I commandeered the living room on Saturday morning and set about moving things forward whilst the family caused even more chaos all around me.

The texturing progressed.
Whilst I was 100% behind this method, I couldn't help wonder what had really let myself into.

Cutting out squares of card for something small is one thing, anyone who has scratch built a slate roof knows that by the time you hit the second half the novelty diminishes, but this, as simple as it was in principle, was something else.

Perhaps I had over-estimated the time it was going to take... maybe... perhaps... erm... yeah... I did. A lot.

Minutes rolled into hours and daylight vanished. By the time everyone was tucked up into bed I put a little backgorund inspiration on.

Resident Evil flowed into Night of the Living Dead and as the credits rolled on Dawn of the Dead a little face appeared at the top of the stairs.

"Were they being chased by monsters Daddy?" Whoops, error.

My daughter was a awake and quite possibly scarred for life. It was around half three in the morning and I still had loads to do if I wanted to get a sealing coat of paint into the boards. I should be taking her up to bed again and settling her down.

"Can I help Daddy?"

I need all the help I can get, and my daughter; a hobbyist? Epic.

"Yes please." I confessed.

My other half woke up a few minutes later. For some inexplicable reason, none of us could sleep, so, perhaps in sympathy, an army of cardboard engineers marched onwards.

Cardboard Engineer Reinforcements - 3.30 am. Thank you guys - I love you.
Not only was the help appreciated but with three people sticking the tiles down, things progressed ever more rapidly. We finished the boards by the time the sun came up and thankfully, we all hit the sack, exhausted.

One of three 2' by 4'  sections.
On an easy Sunday filled with lots of sitting down quietly, pancakes and copious amounts of strong coffee I headed to the garage and sealed the edges of the boards and the sidewalks.

Sealing the main detail on the board, and the sides of the battens, with MDF Primer.
So far so good. Perhaps more of a 'How NOT to' guide for this stage, but after a close call the project was back on track again.

To be continued...

All Things Zombie


Outbeak City: How to Build a 28mm Zombie Gaming Table - Part 3

Part 3 of the construction of my All Things Zombie Gaming Table.

Start at the beginning to read the whole article.

With the raised sidewalks fixed onto the battened boards is was time to go about detailing the board.

The whole philisophy behind this gaming table was detail. The idea was that every inch of the table was treated like an individual figure base, so I felt it was important to avoid shortcuts wherever possible and 'do it for real'. With that in mind I went about cutting out individual paving stones and curbs to ensure the sidewalks would take dry-brushing and ink washes.

"It's Begun!" It was about now I realised how much time this might actually take. 

The curbstones were cut 2/8'' wide and 1'' long. On the corners I switched to 1/2 '' lengths to aid with the curve.

I painted about 10-12'' of PVA at a time as I lay the tiles.
You can just about see the cuts made in the underside of the sidewalk pieces to help define the drainage. I was working away from home for a couple of months whilst I was doing this, so most of the build was done when I came home at weekends but I was able to cut out the tiles during weeknights.

Undercuts, to represent storm drains.
The sidewalks themselves consist of three rows of 6/8'' by 4.5/8''.

Like most gamers, I am a hoarder or all things that 'might be useful one day' so I had a fair amount of card sitting ready to be used. However, to ensure that there was some 'real-world' variation in the paving, to represent replaced slabs, ground heave or gentle localised subsidence, I wanted variation.

For the most part the curbstones were cereal packets and the paving was mostly the type of card that comes in a box of 5 reams of A4 paper (one at the top, one at the bottom) with of different thicknesses card randomly mixed in.

Drain cover, added with checker-plate plasti-card.
On the corners I simply alternated long and short edges to follow the line into the curve and trimmed the edges of the tiles as I went. That gave me a flat edge to work from again.

The tiles were all laid in a basic bricklaying 'running bond' style, offset by half a tile. I deliberately left a small gap between every tile, so that they were not laid exactly flush and a coat of textured paint wouldn't obscure the edges of the tiles.

I added a few random 'broken' slabs, by simply cutting them in half of in thirds at appropriate looking angles.

Finished curb and sidewalk.
To be continued...

All Things Zombie


Outbreak City - How to Build a 28mm Zombie Gaming Table - Part 2

Missed part 1 of this article?

Part 2 of the construction of my All Things Zombie Outbreak City gaming table.

Once I had three identical 2' by 4' battened boards. I lay them side by side and marked the roads and sidewalks.

Measure twice. Draw once. Check, correct and re-draw.

To accommodate tollerances (and my shoddy woodworking) I swapped the boards around as I went, to check that they lined up on every side.

A note on road sizes. I opted for a four inch (10.2 cm) road width, the same approximate size as World Works Games roads, as it strikes a good balance between aesthetics and playability when trying to retain a city-block feel to the table.

Once I was comfortable the measurements I cut to size the second layer sections in 3mm MDF. Being above the level of the roads, this level would represent the sidewalks and hard-standing of the city.

Note: No round corners yets.

I laid out all the sections to check everything was going to fit ok and once I was sure it was within acceptable limits, I cut curves of the top layer into the corners with a jigsaw.


This was also the stage I added a few dropped curbs and cut small notches in the underside of the top layer to represent storm drains. In retrospect, to go the extra mile, I would have cut the storm drains a little deeper and routed small holes in corresponding locations in the sides roads to match.

Finally I fixed the curbs to the base-boards with PVA and, after leaving it to dry for a few days, marked two inch sidewalks onto these sections.


To be continued...

All Things Zombie


Outbreak City - How to Build a 28mm Zombie Gaming Table - Part 1

So, I'd agreed to run a display game at the Eastern Front Wargames Show last year I wanted to make sure the gaming board looked very much a part of the whole set up as I could.

Outbreak City at Eastern Front 2011 - Unfinished, but the foundation is there.

I take most of my 'new toys and figures' photographs on a 2' by 4' section of city board I build a few years back and for games, I use a 4' by 4' board built for a Lord of The Rings 'Shadow and Flame' campaign. Fine for getting the project off the ground and getting some games in but I really wanted to create a new gaming surface dedicated to Modern Zombie gaming.

All Things Zombie is normally played on a 3' by 3' table but to ensure the game didn't look out of place in the context of a big hall next to other large-table games, I decided on a 6' by 4' layout.

Inspired by this EPIC teaser shot from The Extraordinarii and I had a good idea of what I was after. 

The Extraordinarii's amazing 'Small Town USA' layout.
The devil is in the detail on this board: modelled surface with 3D detail, raised curbs, recessed roads, sidewalks and man-hole covers, street furniture, signs, stop-lights, telephone boxes and varying textures and colours. I love the fact this table is quite light and eventually, those are the shades and tones I am after.

I trimmed some A4 paper to scale and began sketching and after a few calculations I set off to the local hardware stores, B&Q and Homebase here in the UK, to buy some timber.

They conveniently sell 6mm MDF in 3' by 4' sheets, and I selected 38mm deep softwood to batten the sheets.

One board down.

I created the batten frame and everything was glued and screwed with all every drill hole counter-sunk.

The batten frame.

I only have one old drill, on a cord, so I had to switch the drill bit and counter-sink back and forth, using a chuck-key for every individual drill hole. My advice; buy or borrow a paired cordless drill set (that's my future plan) and have them set up ready, it will save loads of time.

3 completed base-boards.

Something that bugs me about modular gaming tables is when you accidentally knock them (and I tend to do that) and they shift out of alignment.

To stop this I drilled holes through the battening in every side so that the boards could be fixed together.

Guide holes for linking the boards.

I used a slightly larger than necessary drill bit for these holes to accommodate for unevenness in the boards and my inability to measure drill holes correctly. It worked out fine.

Wing-nut.
They are attached with bots and wing-nuts.

Bolt head.
An extra bit of time and thought, but well worth the effort to avoid player created earthquakes.

To be continued...

All Things Zombie


Outbreak City at Eastern Front 2011

We interrupt our scheduled programme to bring you this news from Outbreak City!

The Lead Will Walk The Earth will be running a display game at Eastern Front:The East of England Wargames Show in Norwich on Sunday 21st August 2011.

Eastern Front: East of England Wargames Show 2011

Historically, Norwich held host to a popular annual show for a number of years. The show began to wane and eventually fell by the wayside and now, after a prolonged drought, the new show organiser Kim Daniels decided Norwich was once again ready for wargaming event. Eastern Front premiered last year and was hugely successful.

The show features a number of display games, a strong list of traders, the ubiquitous bring-and-buy and three competitions: The National DBA league, Hordes/Warmachine and Flames of War.

Inspired by The Extraordinarii's stunning work on his Small Town USA project and in the tradition of all pivotal wargames events I have decided to construct a brand new 6' by 4' Modern City Wargames Table (the baseboard) ready for the event. "Quiiick!!!!" Always up for a slightly foolish challenge I dived right in and construction is in full flow, I will post a full 'this is how I did it' (or didn't quite manage it) after the event.

Luckily for me I kinda forgot that I had promised to make a Dystopian Wars Ocean table for my best buddy and, handily enough, he and Matt from Too Much Unpainted Lead will be running a Dystopian Wars display game at the show too. Double the Van-Damage! So I tried to grow and extra pair of hands (didn't work) and the garage is literally full to the brim with battened MDF. In for a penny, in for a pound. Wish me luck.

Eastern Front, The East of England Wargames Show is being held in the fabulous St. Andrews Hall venue in the centre of Norwich.

St Andrew's Hall - Norwich

Come support the show and if you do visit please drop in to The Lead Will Walk the Earth and introduce yourself.

The Lead Will Walk The Earth will returns to it's scheduled programming. RTA: An All Things Zombie Batrep Part 2 follows next episode.