I'd decided to collect both armies, that I had a full play-set. That way, whenever any of my gaming friends were over we could simply jump right into a game.
Rather than point too much of one side in one go, I decided to keep both sides relatively even and paint an no more than 2-3 units for one side without painting some for the opposing force. It meant that pretty early on I could try out a few quick games with just a few units per side and as the project developed no one side became overtly over-powered.
These Sturmpioniere from the Dust Tactics: Core Revised Set were pretty fun to paint. Once again, I attempted to keep the colours pretty light, using some lighter base colours and much more subtle shading in the form of a watered down wash.
By doing these this way I found the limits of watering a wash and experimented with using De-Ionised water, which I'd been using for cleaning my airbrush, which seemed to help. Which got me thinking about some of the other tools that 'expert' painters use, i.e. thinning mediums.
My conclusion, I think they're onto something.
Showing posts with label Airbrush. Show all posts
Random Encounter 1 - Scratch Built Ork Stompa
Following a huge amount of support from fellow bloggers I'm going to throw in a few random encounters These random encounters will include some of the non-zombie stuff I've been creating over the past few years, either just before or alongside the Outbreak City project.
I recently discovered that Warhammer 40K had it's 25th Anniversary. That sounded like quite a cool landmark until I realised that it meant I had been playing 40K for 25 years; Yikes!
As an Ork player who has never owned anything but Orks so, quite frankly, I'm not that good at 40K and haven't really developed any strategy other than a massed assault. GW got me into this hobby so despite me playing a whole heap of different games now, I still play 40K and LOTR occasionally.
Sat in my bits box for a number of years was the interior of a small waste paper bin which my buddy James said "You should make than into a Stompa." It seemed like a good idea, but I guessed a scratch-built Stompa would require quite a bit of work and whilst my bits box was full, there wasn't quite enough Orky Stuff.
With the introduction of Apocalypse, and the super-heavies, the Orks were blessed with one of the coolest Orky models ever, the Stompa. I picked one up and after struggling to build it (It isn't the easiest kit to build, but it looks good) I found they had very kindly included a few optional accessories. The excuses had to end, I now had the Orky bits I needed to scratch build another stompa.
The model progressed with polystyrene being parcel taped to the waste paper bin to build a basic frame with a layer of papier-maché on top to give a solid base for everything else to come.
The feet were cardboard tube 'legs' with Hirst Arts blocks and for everything else I raided the bits box and tried to replicate GW's Stompa as closely as I could.
Cardboard and plasti-card 'plates' were glued onto the papier-maché with individual rivets super-glued in place. The head was a deodorant cap with stuff stuck on. Cannons, shootas and rockets were made from everything from pipes, to pens, to bits off an old star wars toy - essentially all the best junk out of my bitz box. I used spare goblin and Ork figures and one I'd saved from the original Stompa.
It took quite a bit of time to finish and being a model for a GW game, enter scale creep (it ended up bigger than intended), but all it does the trick.
We tend to work on 'secret' projects for our 40K Apocalypse games so that there can be a big reveal come gaming day (a tradition stated by James), and this one was fun to deploy.
And I couldn't post this without a comparison shot. Mummy on the left, completely scratch built. Baby on the right; GW's kit, with a few bits missing, used on mummy.
If 40K is your thing here's a video from a 40K Apocalypse game played in the Man-Cave back in May 2010, 7000 points per side. The two Stompas see action side by side.
Next time, we return to the construction of Outbreak City for my All Things Zombie campaign.
Well badly Mech! |
Ball point pen Supa Rockets! |
Belly plates. Sigil is off the original Stompa. |
Titan Close Combat Weapon - GW, Lego and other bitz. |
Big Shoota turret. |
Da bit dat makes da smoke and noise! |
Ork pilot, otherwise known as a Stompa-er. |
"We will fix it, we will mend it!" |
Shoulder plate courtesy of Darth Vader's Tie Figther circa 1980 something. |
We tend to work on 'secret' projects for our 40K Apocalypse games so that there can be a big reveal come gaming day (a tradition stated by James), and this one was fun to deploy.
That's what I call a Deth Kannon! |
If 40K is your thing here's a video from a 40K Apocalypse game played in the Man-Cave back in May 2010, 7000 points per side. The two Stompas see action side by side.
Next time, we return to the construction of Outbreak City for my All Things Zombie campaign.
Airbrushing Wargame Terrain: Dispelling the Myths
As stated in my previous post I used an airbrush to help with the look of my Outbreak City roads. The roads were the second attempt at using an airbrush. Here is my first.
Generic 28mm Ruins - Made for 40K, LOTR & Zombies |
Every Day is a School Day
When I joined the blogosphere at the beginning of this year it was clear how much incredible talent there was around and how much we can learn from all the gamers, painters, modellers, customizers and bloggers in the community.
A big part of starting this blog was to develop new skills under the watchful eyes of a discerning audience. We all like to look at the shiny things we see in magazines and on commercial websites, but what does it really take to achieve the look and feel of those pieces for ourselves?
A school friend of mine, Jude, recently became interested in the hobby again after an absence of around 20 years. His ability to pick up his hobby tools and leap into the fray again at such a high standard is, quite frankly, astounding. Here’s an example of some of his recent work. Once again, consider the 20 year absence from the hobby. Jealous, me? Well, just a little.
Jude's ForgeWorld Demon Prince - Superb. |
Why an Airbrush?
During a recent get-together we talked about making custom terrain to pro-modelling standards. He immediately asked “Do you have an airbrush?” My answer was no. After all, it’s one of those expensive gadgets that only people with subscriptions to military modelling know how to use, they take ages to set up and clean, mixing paint is a nightmare and you need a huge compressor which is really noisy, certainly no use when the kids have gone to bed. All myths! Whilst that might have been true 10-15 years ago. Today it is a very different story.
Five minutes later he’d set his one up, given a quick demo and I was having a go. What can I say? I was hooked from my first ‘pfffshhhht’. “Where can I get one?” I asked.
2 days later my first airbrush arrived. I picked up the cheapest bundle I could find which included 2 airbrushes and a compressor. The verdict?
![]() |
The cheapest Airbrush I could get on e(vil)Bay. £80 all in. |
The Verdict
For anyone who makes war games terrain (quite a few of us), buildings or vehicles it is a highly recommended investment. The airbrush is simple to use, easy to clean, quick to set up or dismantle and the compressor is actually quite quiet and only runs when it needs to, stop spraying for a few seconds and it stops running. I’ve purchased a little acrylic mixing medium and some ionised water for cleaning (you shouldn't use tap water) and that’s that.
The Result
Here’s the rest of those generic 28mm ruins that I recently gave the airbrush treatment to. It was my first attempt at using the airbrush and after initially spending so much time on these (they were dry-brushed copiously to before I started) I was pretty nervous. I’m pleased with how they turned out and can’t wait to use the airbrush on future projects.
Put acrylic mixing medium in the cup. |
Add umber acrylic paint. |
Mix in some black. Spray slowly and evenly. |
Increase the paint slowly by pulling the lever back. |
Matt from Too Much Unpainted Lead discovered this little gem from RubbishInRubbishOut in which Viv shows us, with the right medium, you can even put house-paint through your airbrush. It is an awesome channel from one of the Battle Bunker TV guys and well worth checking out, if you've not already done so, and you make, or want to, make your own terrain.
The Road to Hell – 28mm Roads for Modern (Zombie) Wargames
Can you build a modern road for tabletop zombie games in just a few days?
As stated in my previous post, 4 days prior to our Salute-n-zombie-table-top-gamingathon weekend I foolishly decided that I needed a road for ‘On The Road’ scenario for our play-test game of Iron Ivan Games ‘No More Room In Hell.’ As if I didn’t have enough to do already.
The scenario features a road running the length of a 4’ by 4’ table, jammed packed with, to quote the book ‘as much rubble and destroyed cars as your toy box can provide.’ I didn’t have the rubble but that wasn't what I pictured in my head and I had a shed-load of cars. I just needed the road.
![]() |
Kinda like this? Image from dennisflood.com |
The concept was to build, as quickly as possible, a road that could be laid over any gaming surface (city, woodland or desert) that ran the width of the table and looked as much like the World Works Games roads as possible. I really like the WWG roads, however, having got increasingly interested in the hobby side of things I wanted to try and replicate that look as much as possible with a 3D road. Challenging, but seeing the superb standards that many bloggers are showing in their modern basing I thought it was a simple matter of translating the skills to a bigger scale. i.e. treat the roads like bases - long, thing, giant bases.
The Sketch
No sketches actually, but plenty of scribbled calculations. After a few tweaks and adjustments I settled on making the roads approximately 4 inches wide with 12 inch and 24 inch section lengths. To allow for a double width road across a 4’ by 4’ table. I made 10 feet all in all, giving a little extra for creating other city-wide layouts.
The Realisation
6mm MDF was the material of choice. It is about the thinnest I find I can make terrain pieces and keep warping within reasonable limits.
I cut four 24 inch and two 12 inch sections. I covered one side in PVA glue, brushing in the direction of the road, then added sand, sprinkled through a sieve. Note: It is recommended that you don't use the sieve from your kitchen. I did. I had to buy a new one right away. Whoops - Dog-house!
Once the PVA was dry I sprayed the roads with Halfords Matt Black Acrylic undercoat. I used a relatively light coat to help fix the sand.
Sand covered road sections - Pink undersheet optional |
Once the PVA was dry I sprayed the roads with Halfords Matt Black Acrylic undercoat. I used a relatively light coat to help fix the sand.
Spray-painting underway. |
When the spray paint dried I painted the whole thing with a coat of diluted black house paint, about 1:4 mix of paint to water. This was to fully seal the sand and soak into any parts that regular painting wouldn’t reach.
'Blaaaaaaack!' |
Dry-brushing followed with a ½ inch brush with long bristles using Games Workshop Fortress Grey and Space Wolves Grey. I then air-brushed patches, tyre marks and a darkened centre-line on each section using Miniatures Paints #86 - Umber.
Airbrushed centre-lines. |
Yellow edging and white centre-lines were added by hand using various acrylic paints, using a ruler as a guide. Then came a few oil stains added with Windsor and Newton Nut Brown Ink.
Someone needs a top-up. |
Next, small cracks were painted and highlighted using acrylic paint.
That'll need some attention before the frost hits. |
A coat of acrylic spray varnish was added and, once that was dry, flock and a few Army Painter grass tufts and static grass were added to finish off the look.
Army Painter - Grass Tufts |
The Result
I am pretty pleased with the final result, especially considering the relatively short time it took to finish. In conclusion, yes, you can build a modern road for tabletop zombie games in just a few days.
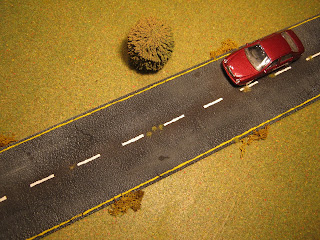
The finshed road - 4 days flat. |
I didn’t add the flock or the tufts until after the game it was made for (I only bought the tufts at Salute, the day before we played the scenario - The battle report is to follow). There was a small amount of warping in the 24 inch pieces, tolerable but I’d like to find a way to fix it if I can. The airbrush helped considerably with the ‘grubby’ feel. It’s a new purchase and I have been pleasantly surprised by how easy it has been to use. More on the airbrush next time.
Subscribe to:
Posts (Atom)