Start at the beginning to read the whole article.
With the raised sidewalks fixed onto the battened boards is was time to go about detailing the board.
The whole philisophy behind this gaming table was detail. The idea was that every inch of the table was treated like an individual figure base, so I felt it was important to avoid shortcuts wherever possible and 'do it for real'. With that in mind I went about cutting out individual paving stones and curbs to ensure the sidewalks would take dry-brushing and ink washes.
 |
| "It's Begun!" It was about now I realised how much time this might actually take. |
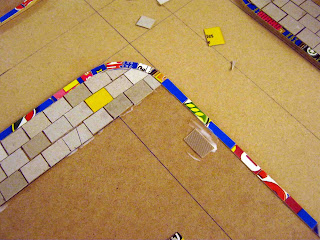
The curbstones were cut 2/8'' wide and 1'' long. On the corners I switched to 1/2 '' lengths to aid with the curve.
 |
| I painted about 10-12'' of PVA at a time as I lay the tiles. |
 |
| Undercuts, to represent storm drains. |
Like most gamers, I am a hoarder or all things that 'might be useful one day' so I had a fair amount of card sitting ready to be used. However, to ensure that there was some 'real-world' variation in the paving, to represent replaced slabs, ground heave or gentle localised subsidence, I wanted variation.
For the most part the curbstones were cereal packets and the paving was mostly the type of card that comes in a box of 5 reams of A4 paper (one at the top, one at the bottom) with of different thicknesses card randomly mixed in.
 |
| Drain cover, added with checker-plate plasti-card. |
On the corners I simply alternated long and short edges to follow the line into the curve and trimmed the edges of the tiles as I went. That gave me a flat edge to work from again.
The tiles were all laid in a basic bricklaying 'running bond' style, offset by half a tile. I deliberately left a small gap between every tile, so that they were not laid exactly flush and a coat of textured paint wouldn't obscure the edges of the tiles.
I added a few random 'broken' slabs, by simply cutting them in half of in thirds at appropriate looking angles.
To be continued... |
| Finished curb and sidewalk. |
All Things Zombie


